Welcome to the second quest in the Cave Goblin quest series, where the spotlight is on the Dorgeshuun, or Cave Goblins, subterranean goblins that inhabit the Tunnel Network on the southern side of Misthalin. This quest series is about how the H.A.M. group has plans to eradicate Dorgeshuun. During Death to the Dorgenshuun in RS3, players will visit the mines where the goblins live and have a deep fear of a second attack from the H.A.M. group. During this period, the cave goblins decide to send an agent to the surface to investigate, but they don’t want to go mindlessly without a guide in general.
Death to the Dorgeshuun Requirements RS3
For this quest, players need to be Members and complete The Lost Tribe quest to access Death to the Dorgeshuun in RS3. Along with this basic requirement, there are also some skill and item requirements that are essential for progression in this medium-length quest. Here’s the list of what players need to complete the quest:
- 23 Agility
- 23 Thieving
- 2 full sets of HAM robes (Hood, Shirt, Robe, Gloves, Boots, Cloak, and Logo)
- A light source like Bullseye Lantern
- A melee, magic, or necromancy weapon or ability
- Non-ranged armor and weapons
- Food
- Lockpick
- Spiny Helmet or Slayer Helmet, and a rope for this method (If you have never descended into the Lumbridge Swamp Caves)
- Games Necklace (Only if you complete Tears of Guthix)
During Death of the Dorgeshunn in RS3, players will face two types of enemies: Sigmund at level 42, a high-ranking member of H.A.M., and 3 Guards at level 36. Be prepared to fight them during the quest, but don’t worry; it shouldn’t be too difficult to defeat them.
Death to the Dorgeshuun RS3 Walkthrough
To begin with the Death to the Dorgeshuun in RS3 quest, you must head to the Lumbridge Castle basement, located in Lumbridge; the home of Duke Horacio. It’s essential you have a light source before you go down. To go directly to the basement, you need to enter the kitchen and use the trapdoor. Once you descend, turn on the light source you have chosen, and enter the cave to the rear of the basement. You must walk to the first intersection inside the dungeon, find Kazgar, and talk to him. He will show you all the way from the caves to the mines.
Plans To See The World On The Surface
Once Kazgar has finished showing you all the way through, it’s time to talk to Mistag. He’s a cave goblin who fears that H.A.M. leaders have another plan to attack them again. This situation is why the Dorgeshuun clan has plans to send an agent directly to the headquarters of the rival group. It’s important to notice that Dorgeshuun has never seen the surface before; they would rather not send their agent without guidance. Mistag will ask you to make a tour of Lumbridge for the agent and have a plan to find a pair in disguise to blend among H.A.M. people.
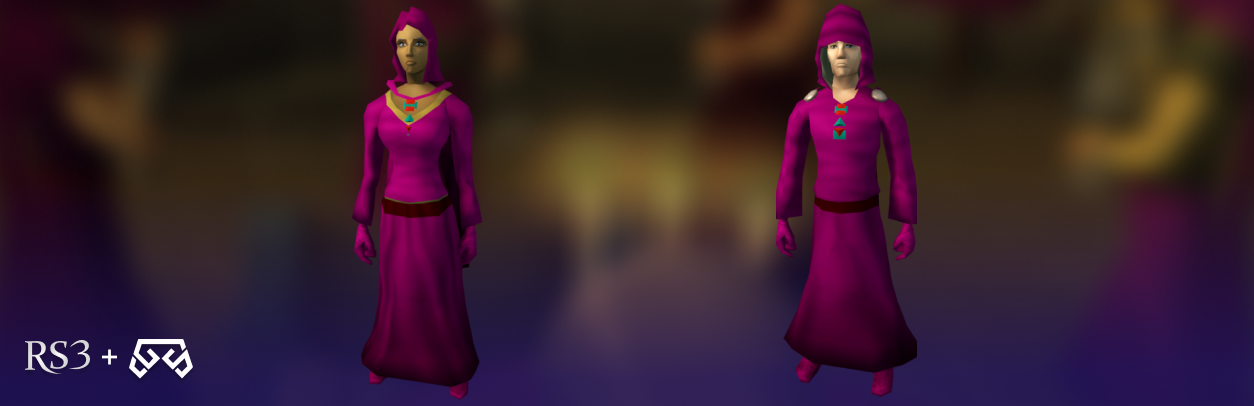
At this point, you will need to get 2 sets of H.A.M. robes. If you don’t have any, you can buy the full set on the Grand Exchange or pickpocket some H.A.M. members; remember, you will need the whole set, not just a few pieces. Get the shirt, robe, hood, cloak, logo, boots, and gloves of the H.A.M. robe set, head to the Lumbridge Castle Cellar, and talk to Zanik. Before you reunite with Zanik, lose any possible followers; otherwise, she will say your pet will get in the way. If you lose Zanik for any reason, you can go back to the Lumbridge Castle Cellar and meet her again there.
A Guided Tour of Lumbridge
After talking to Zanik, she will take one of the robes set from you, and she will ask you to show her Lumbridge. Be careful since Zanik tends to get stuck behind walls and doors, but, fortunately, if you get too far from her, she will teleport directly to you without problems. During the walk around Lumbridge, you can ask her if she has seen enough to know where you need to take her.
When you are walking with Zanik, you may face a bug if you take her outside the castle too quickly. Doing this action will skip a crucial dialogue, and at every chance you speak with Zanik, she will ask you to take her outside the castle, no matter the location you are in. To avoid this bug, you must go back in and then step outside through the castle doors, and once you are on the very block outside, a skippable cutscene will begin. You can skip this if you like and will then be able to access the critical dialogue for the quest progression.
Once you start this conversation, Zanik will teleport to the nearby square. You must follow some steps but have a particular order, so to avoid confusion, here is the order to make your way through the Death of the Dorgeshuun in RS3 quest faster:
- Talk to Duke Horacio upstairs in the castle.
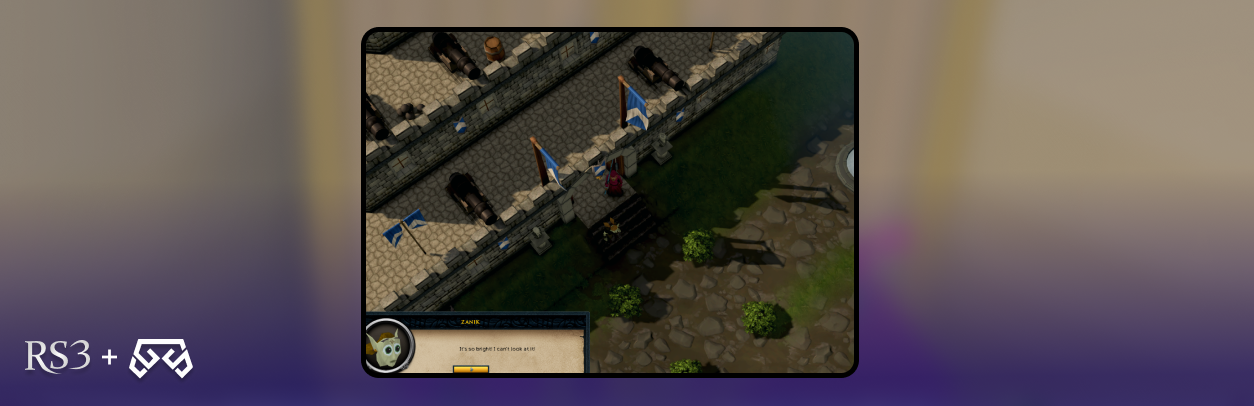
- Take Zanik outside the castle. She will tell you about seeing the sun for the first time with a brief dialogue. Click through this dialogue to proceed with the quest. In any case, you won’t get the message; take Zanik back into the castle and then out again; it will be automatically fixed.
- Talk to any man or woman; you can find a man in the next room next to Duke Horacio.
- Take her to see a level 2 Goblin; you can find some of them across the bridge, east of the castle. Try to get Zanik to walk into the goblin. If Zanik doesn't automatically talk when in close range of a goblin, repeat the process to go back in and out again.
- Talk to the general store manager or the assistant; Zanik will buy off a Bucket, a Hammer, and a Newcomers Map.
- Talk to the Lumbridge Sage outside the Lumbridge Castle.
- Zanik received her mark.
- Talk to Father Aereck in the church, located in the opposite direction of the castle.
- There are many other people who will talk to or about Zanik but are not required.
Once you finish these steps and talk to the required people, you must ask Zanik about the mark on her forehead. There is a chance she may not respond, if this occurs, teleport away and then return to the basement. She will tell you about the origin of the mark which she received while collecting the Tears of Guthix, and she will talk about her destination to do something great.
After finishin this dialogue and suggest heading to the H.A.M. hideout. It’s time to put on your H.A.M. robe set and walk to the Old Mine Entrance, located northeast of Lumbridge, south of the God Statue, and west of the Cow pen.
Headquarters
When you arrive at the headquarters entrance, you must pick a lock on the trapdoor that will lead you to the dungeon. You will need to go down on the ladder and talk to a H.A.M. member or guard. He will tell you about the big plans the leaders, Sigmund and Johanhus, have to get rid of the Dorgeshuun; sadly, they won’t reveal any details to regular members of the organization.
Finding Johanhus Ulsbreatch is relatively easy; he’s located in the southern room. Talk to him about the Dorgenshuun. As the guard mentioned, he won’t share any details with you. You must wander around the south of the main H.A.M. room; you will see Zanik spot a trapdoor behind the banner. Here, you have to hover the mouse and right-click on the dirt tile, pick the trapdoor lock, and go down. At this point, you will find yourself in the storeroom.
During this part of the quest, you can get caught, and a guard will send you directly to jail, but don’t worry too much because Zanik will help you escape. The only downside of being caught is you have to kill the guard with Zanik all over again. Apart from that, here’s what you need to do:
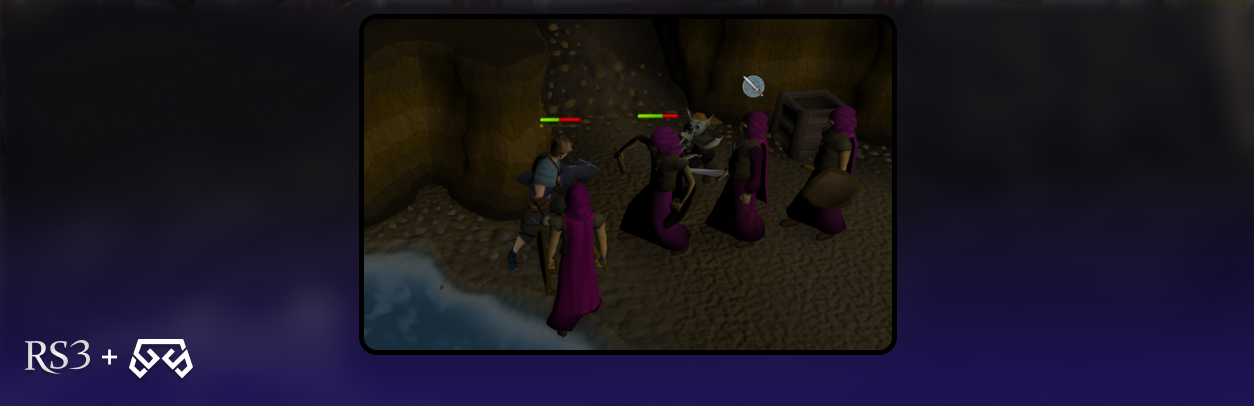
- You will see the first senior guard, and he will tell you to go back upstairs since regular members aren't allowed down there. Pay no attention and head to the west past the guard. When the guard turns to stop you, Zanik will shoot him with her crossbow.
- Once you are on the west side, squeeze through the crack in the south wall to get into the bottom-left room. You have to emerge through the crack in the opposite wall, but only while the guard in that corridor has his back turned. Stand one tile north of the guard to the west and talk to him, and Zanik will use her crossbow again and kill him.
- Don't move after taking out the second guard because Zanik will interrupt you. You will immediately see a guard patrolling the central corridor. Talk to Zanik and call "Now!" when his back is turned, and she will snipe him.
- Move to the eastern side of the central corridor, stopping just before the guard can see you. Then, run east and south down the room at least 2 steps, making the northeast guard follow you. Zanik will shoot him as he passes the central corridor.
- For the final guard, go to the end of either the west or east passages and talk to Zanik again. Tell her to wait there, then go to the other passage via the central corridor and distract the guard while she shoots him.
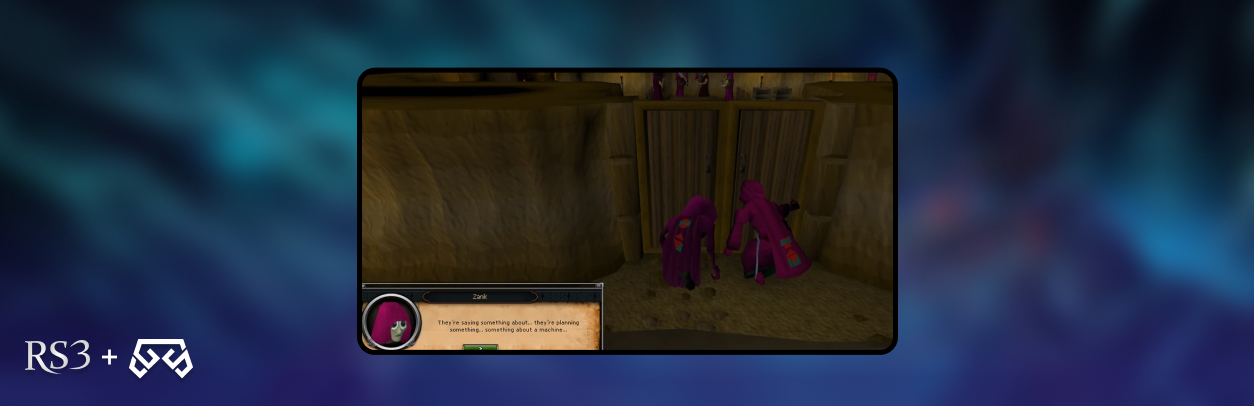
- Once you and Zanik take down all the guards, get close to the door and listen. You will hear how a few people are having a crucial conversation in the large hall. Unfortunately, you will be unable to hear what they are saying. Zanik will tune up her hearing skills, and she will tell you what the people inside are saying. They are talking about a machine planned to be used for evil purposes. Before Zanik hears all the information, a senior guard catches you both, and will throw you and her directly into jail.
Bitter Wake Up
Continuing with the Death of the Dorgeshuun in RS3, you will wake up behind bars just to find out Zanik didn’t get the same treatment as you. At this point, talk to Jimmy the Chisel, and he will inform you Sigmund took Zanik outside. Right-click on the jail door and pick-lock it to escape from the jail. If, in any case, you skip talking to Jimmy or forget to do it, you can speak with one of the members and get out of the H.A.M. hideout.
You will find Zanik near the entrance once you leave the hideout. When you get close to her, you will notice she is not breathing, and the mark on her forehead is glowing. Pick up Zanik’s body. You will find her body is in your inventory, and you can teleport to home without returning to the Lumbridge Castle Cellar. During this process, you must teleport directly to the Tears of Guthix Cavern with a Game Necklace, but only if you have completed the Tears of Guthix quest before.
If you have not yet completed this quest, you can unlock the opening from the Lumbridge Castle cellar to the Lumbridge Swamp Caves. Entering as though you were to enter the Dorgeshuun mines, but instead taking a turn through the tunnels to the opening that leads to the Tears of Guthix cavern.

Tears of Guthix
Upon arrival at the Tears of Guthix location, find and talk to Juna. She will request you to collect 20 blue tears to bring Zanik back to life again. You will find the blue tears because these add to the count; beware of the green tears because it will subtract from the counting. During this part of the quest, you will see a time left on the screen, but don’t worry; there is no time limit. These tears collected won’t count on your weekly Tears of Guthix progress and won’t give you experience.
When you collect all the tears, a cutscene will show. Zanik will explain what she heard in the H.A.M. meeting room. All the people gathered there, Johannus, Sigmund, The H.A.M. Deacon, and a senior guard talked about building a drilling machine at the Lumbridge Water Wheel. They plan to ask for assistance from the dwarves, and their intentions are to flood the swamp cave with the waters of the River Lum.
Enter the Dungeon
Once the cutscene is finished, home teleport to Lumbridge and head directly to Lumbridge Castle Basement one more time using the trapdoor in the kitchen; this will make Zanik follow you again. You must go to the Lumbridge Watermill; for this, go across the bridge to the east bank of River Lum and head north until you find a cow pasture on one side of the road. You will also see a chicken farm located on the other side.
When you are at the farm, you will see a trapdoor leading to the south side of the watermill. At this point, you must wear the H.A.M. robe set if you want this trapdoor to work properly. You must talk to the dwarf guard near the trapdoor and tell him you are here to help.
Unequip all your main-hand and off-hand weapons and shields and speak to Zanik. You must search the empty crate south of the dwarf. Zanik will suggest hiding herself in one of the crates while you carry it inside the dungeon. Automatically, you will pick up the crate, and you must go down the trapdoor to enter the dungeon. Once you are in, you can take off the robe set and wear your armor and weapons again.
The Battle
You must prepare yourself for the upcoming fight with Sigmund, so head to the west and talk to him instead of charging against Sigmund immediately. It’s important that you trigger the dialogue with Sigmund to make Zanik attack him, which is essential to complete the quest.
During this part of the quest, you can use Cinderbane Gloves to poison Sigmund without the use of dialogue, and you will see him die without the possibility of switching to protect from range. This will be an option, but if you want to kill Sigmund in a regular way, you must know he is level 42 and will appear along with three level 36 guards.
Sigmund will use a protection prayer based on your attacks against him; you must focus on his henchmen first. Just like all NPCs, the protection prayer Sigmund uses will not cease, and it gives him 100% protection. After you defeat the guards, Zanik will help you with ranged attacks; during this time, Sigmund will change his protection to ranged attacks. It’s your call to attack him using melee, magic, or with necromancy. When he’s at 10 life points, he will escape with a ring of life, cursing you and promising to hit back at you and your goblin friend. You can die or leave the area while fighting, but Zanik will remain there waiting for you to return. Be careful if something like this happens because the guards will respawn, and you will have to fight them again, and Sigmund will regenerate his health.
Once you clear the area, break the drill machine to mess up their plans. It’s time to head to the southern tunnel and exit from there. You will be back in front of the Dorgeshuun leaders, and you will discuss if the city should be open for the surface dwellers. Once Zanik finishes all she can tell them about you, they will welcome you into their city, Dorgesh-Kaan. You just completed the Death to the Dorgeshuun in RS3 quest.
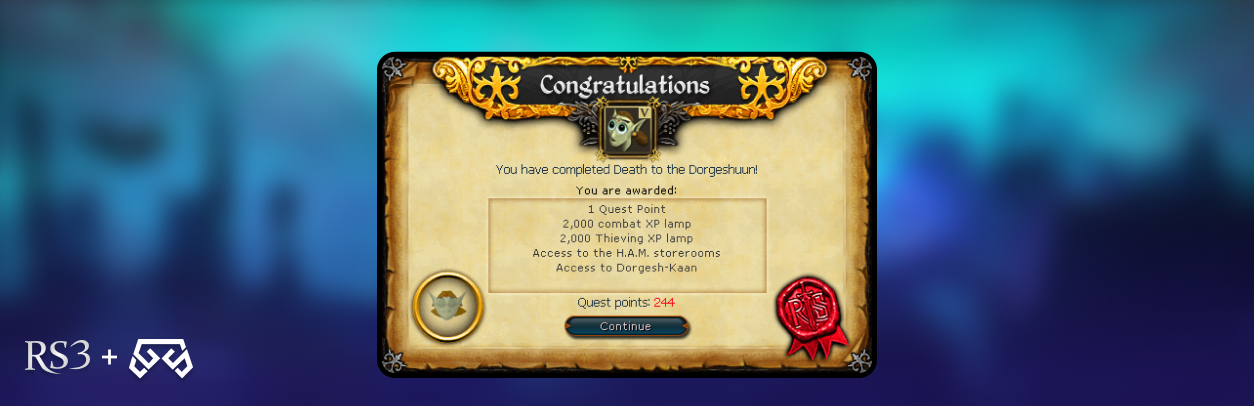
Death to the Dorgeshuun RS3 Rewards
Congratulations, you just finished Death to the Dorgeshuun in RS3. After all that you did for the Cave Goblins, you certainly deserve a reward for all the hard work. Of course, this quest series will continue, but for now, here are all the rewards you will get after completion:
- 1 quest point
- 2,000 Thieving experience lamp
- 2,000 Combat experience lamp in either Attack, Defense, Strength, Constitution, Ranged, Magic
- Access to the H.A.M. storerooms, where you can loot items.
- Access to Dorgesh-Kaan, the Dorgeshuun city.
- Access to Dorgesh-Kaan South Dungeon and a route to Kalphite Lair from there.
- Access to the watermill tunnel (Dartog will appear there, and you can freely travel between the Lumbridge Castle cellar, the Dorgeshuun Mines, and the watermill tunnel).
- Access to the cave goblin technology tree with level 40 Invention
- 2 Treasure Hunter keys
Unfortunately, players that are in the Ironman mode won’t receive the two Treasure Hunter keys. This game mode won’t allow players to have this type of reward since it’s an outside reward, and this game mode is based on only playing with the in-game resources.
Death to the Dorgeshuun RS3 FAQ
There is always some question that needs to be answered during each quest, and Death to the Dorgeshuun is not an exception. We are here to help, so let’s begin:
What is the Death of the Dorgeshuun Quest Line?
The Death of the Dorgeshuun is the second quest in the Dorgeshuun quest series or Cave Goblin quest series that follows the plans of H.A.M. to flood the underground Swamp Caves.
Should I Complete Tears of Guthix Before Start The Death of the Dorgeshuun in RS3?
It’s recommended to finish the quest Tear of Guthix if you want to travel faster to one of the locations during the Death of the Dorgeshuun RS3. However, it’s not mandatory since you can reach Tears of Guthix through the Lumbridge Swamp Caves.
How Many Quests Are in The Cave Goblins Quest Series?
In this quest series, you will find five different quests, starting with The Lost Tribe, then Death of the Dorgeshuun, Another Slice of H.A.M., Land of the Goblins, and The Chosen Commander.
RS3 Death to the Dorgeshuun: Conclusion
That’s it; you just completed the second quest in the Cave Goblins series. You helped these creatures avoid a savage attack on their home, and you now have access to the city of Dorgesh-Kaan. Thank you for coming all the way with us to complete the Death of the Dorgeshuun in RS3; if you like this blog, you will surely enjoy more of these guides posted on our blog, and If you want to boost your experience in RuneScape, you can buy gold, this way you can focus on what really matters, having fun. See you next time!